This is the second part of a tutorial series about creating a Full Body FPS controller. It covers the Upper body IK, head stabilization, weapon sway and an ADS system. This part requires FinalIK (An alternate part 2 without FinalIK is planned).
Part 1 : Base Character Controller
This tutorial is made with Unity 2019.1.9f1
1 – FinalIK Setup
As we’re going to use FinalIK in this part you should start by importing it in Unity. When it’s done create a script UpperBodyIK that will be the main controller of the IK system.
1.1 – LookAtIK setup
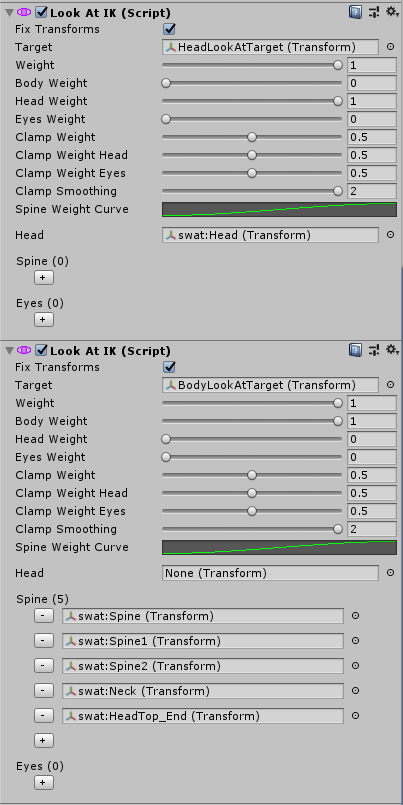
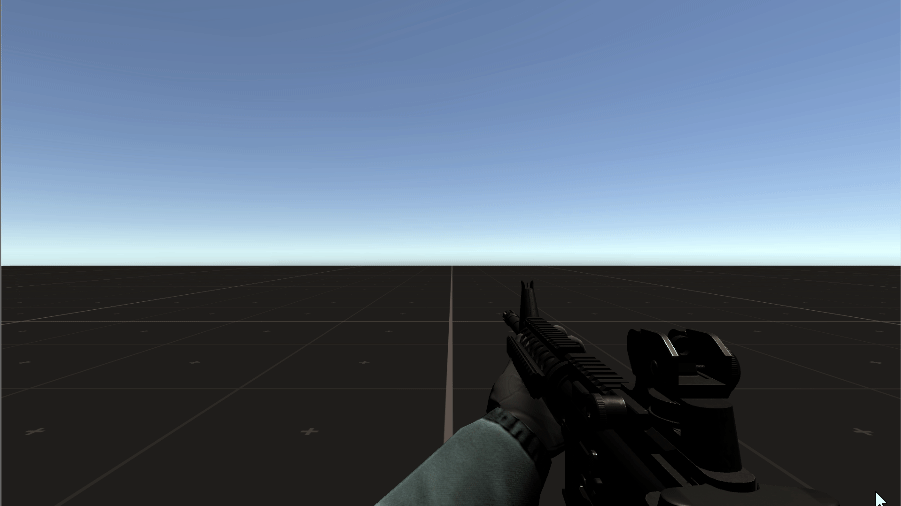
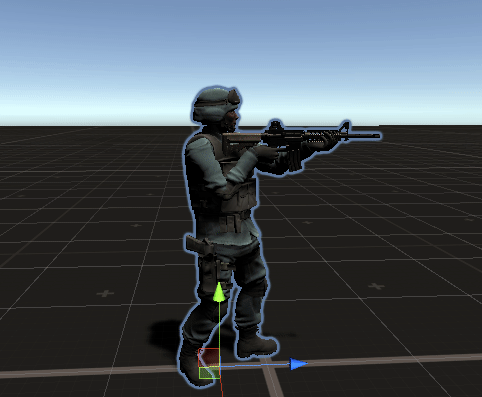
The first component from FinalIK that we are going to use is LookAtIK. Add it to your player, add the head bone to the head field and the spine bones to the spine field. Set the Body Weight and the Head Weight to 1. We also need a target so create an empty Gameobject and call it HeadLookAtTarget. Put it in front of your character but not too close. My character is in (0, 0, 0) and my target is in (0, 1.5, 20). Your character should look like that:
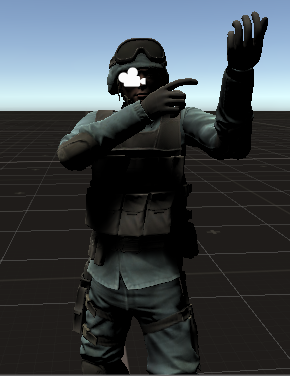
Let’s ignore the arms for now, just look at the head and the body. If nothing looks wrong to you, try to move the Body weight between 0 and 1. You might notice that with a weight of 1 our body is too straight and it doesn’t look like a military position as the body should be at an angle between 0° and 45°.
To fix this issue we need another LookAtIK component, but with another target only for the body. So you can add another LookAtIK and create a new empty Gameobject that we will call BodyLookAtTarget. For testing purpose you can set the position to (40, 1.5, 20). But we will manage it from a script later.
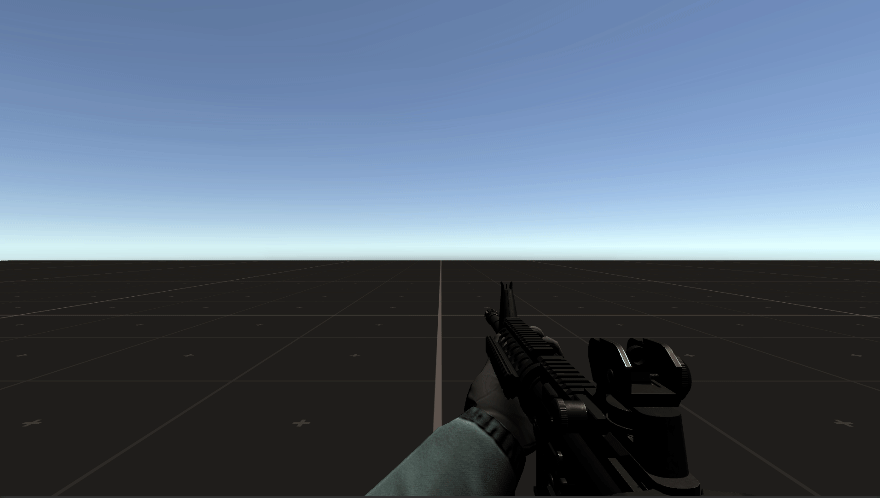
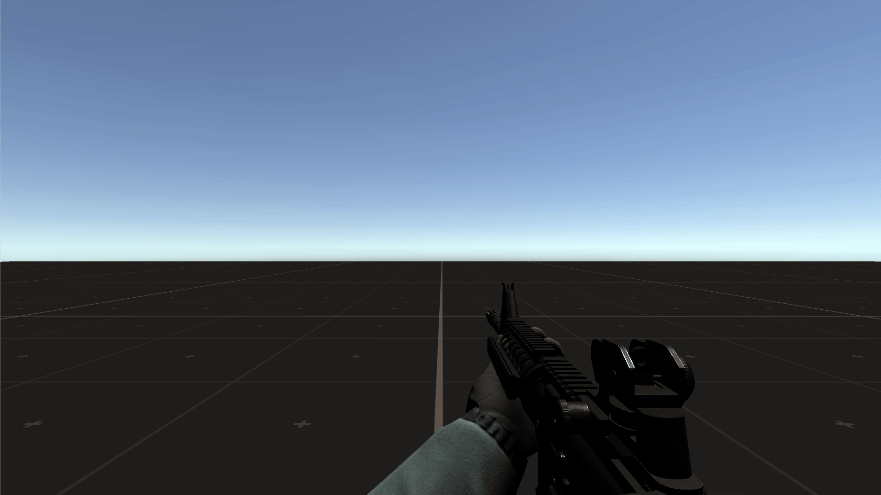
Now you may have one of the two results below:
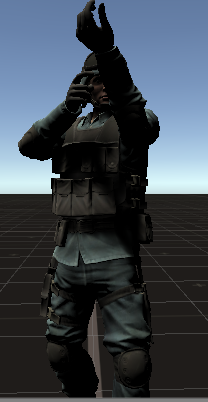
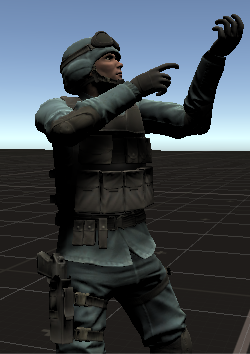
The good one is the first one, of course. But wait, why if we are doing the same thing we aren’t having the same result ?
If you know how Unity works you should know that there is a script execution order. You can set your execution order in the project settings, but when you don’t or when there is multiple instances of a same script Unity decide itself which one to run first (and it’s not always the same result).
That means that on the first image the LookAtIK of the body execute first then the one from the head. But in the other way the result is wrong because the LookAtIK from the head run first and since the head is on the body when we move the body it moves the head.
There is a pretty simple way to fix this and we are going to do that in the UpperBodyIK script. First add two LookAtIK fields. Then in the Start method disable both components. We will update them manually. It will allow us to have full control over the update order which is very important here.
using UnityEngine;
using RootMotion.FinalIK;

public class UpperBodyIK : MonoBehaviour
{
    #region Variables
    [Header("Final IK Modules")]
    [SerializeField]
    private LookAtIK m_headLookAtIK = default;
    [SerializeField]
    private LookAtIK m_bodyLookAtIK = default;
    #endregion

    #region BuiltIn Methods
    private void Start()
    {
        m_headLookAtIK.enabled = false;
        m_bodyLookAtIK.enabled = false;
    }

    private void Update()
    {
        m_bodyLookAtIK.solver.FixTransforms();
        m_headLookAtIK.solver.FixTransforms();
    }

    private void LateUpdate()
    {
        LookAtIKUpdate();
    }
    #endregion

    #region Custom Methods
    private void LookAtIKUpdate()
    {
        m_bodyLookAtIK.solver.Update();
        m_headLookAtIK.solver.Update();
    }
    #endregion
}
Now you should have the first result. It does look better right? Later in the script we will give an angle in parameter and the script will set the body target accordingly. We are done with LookAtIK for now.
1.2 – ArmIK Setup
Just before adding our ArmIK components we need to give this poor character a weapon in his hands. You can give him any weapon, but you should check that the magazine is detachable and that the bolt carrier can be moved. It’s not mandatory, but it does add more details.
If you want a Russian weapon you can use this one from the asset store or if you prefer an American weapon you can use this one instead. As my character is a SWAT soldier, I will take the American one.
Add your weapon of choice as a child of the right hand bone. Try to put it in the hand of your character so it looks like that:
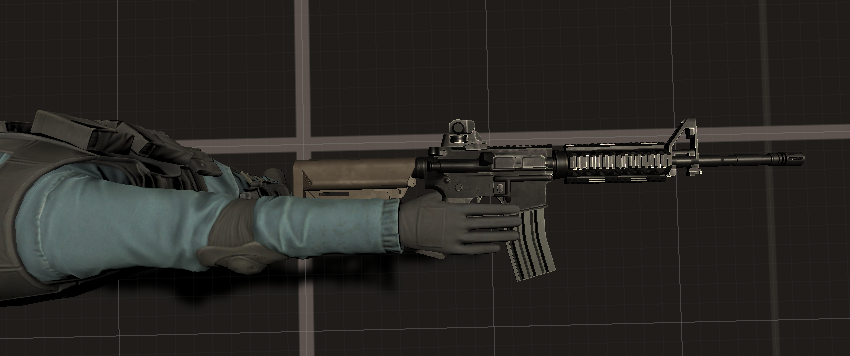
You can (and most certainly will) adjust the position later when the IK system will be working.
Now you can add two ArmIK components on your character and drag and drop the required bones in the specified fields.
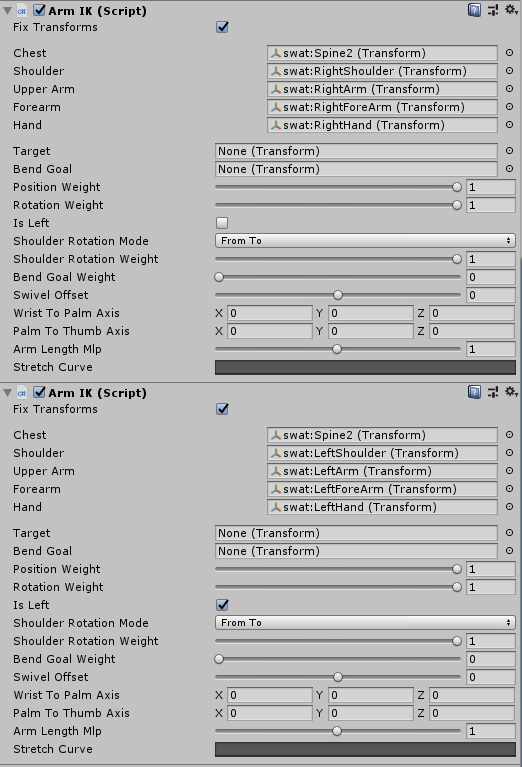
Same as LookAtIK we need to add some targets but this time it’s a little different.
For the left hand target, create an empty Gameobject and put it as a child of the weapon. Move it roughly under the hand guard we will edit the rotation and position later in play mode. Don’t forget to drag and drop the left hand target in the ArmIK script.
For the right hand, we need three targets. The first one will be the one used by the ArmIK script. Add it as a child of your Player Gameobject. The next two targets will be a child of the head bone. One will be our reference position for the “Hips” weapon position while the other one will be our ADS (Aim Down Sight) position. In a script later we will Lerp our target position between theses two positions.
To set the positions easily you should move them in Play mode and copy/ paste the positions / rotations. Also note that you can swap the targets in the ArmIK component to check if the positions are good. You may need to adjust them later, after we updated the UpperBodyIK script.
Now same thing as in the previous part the execution order is still very important as the left hand target position depends on the right hand position. So again add two ArmIK field in the UpperBodyIK script, disable them in the Start method and update them manually.
    ...

    [SerializeField]
    private ArmIK m_leftArmIK = default;
    [SerializeField]
    private ArmIK m_rightArmIK = default;

    ...
    private void Start()
    {
        m_headLookAtIK.enabled = false;
        m_bodyLookAtIK.enabled = false;
        m_rightArmIK.enabled = false;
        m_leftArmIK.enabled = false;
    }

    private void Update()
    {
        m_bodyLookAtIK.solver.FixTransforms();
        m_headLookAtIK.solver.FixTransforms();
        m_rightArmIK.solver.FixTransforms();
        m_leftArmIK.solver.FixTransforms();
    }

    private void LateUpdate()
    {
        LookAtIKUpdate();
        ArmsIKUpdate();
    }

    ...

    private void ArmsIKUpdate()
    {
        m_rightArmIK.solver.Update();
        m_leftArmIK.solver.Update();
    }
1.3 – Full Body Biped IK + Head Effector Setup
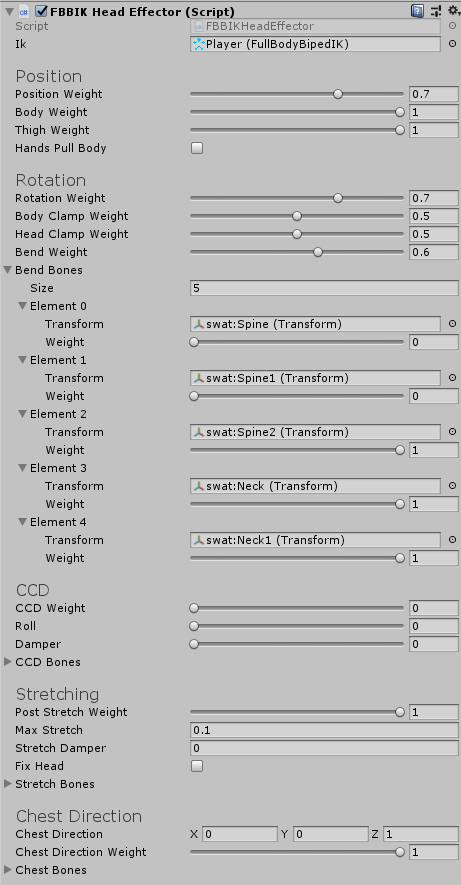
The last FinalIK component that we need is the Full Body Biped IK (FBBIK) with his Head effector. Add the Full Body Biped IK component on the player and create an empty Gameobject on which you will add the FBBIK Head Effector component. Move this object as a child of the Player object.
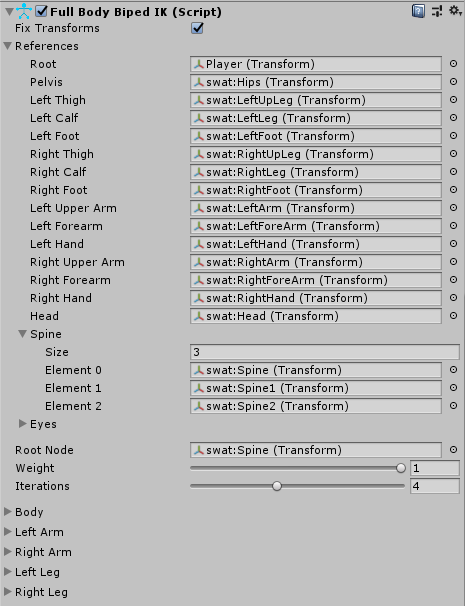
We will not use the FBBIK component directly as it isn’t of any use for us right now. But the Head Effector is very important as it will help us solve the head stabilization issue.
Again, we need to fix the execution order so let’s go back inside the UpperBodyIK script.
    ...

    [SerializeField]
    private FullBodyBipedIK m_fbbIK = default;

    ...

    private void Start()
    {
        m_headLookAtIK.enabled = false;
        m_bodyLookAtIK.enabled = false;
        m_rightArmIK.enabled = false;
        m_leftArmIK.enabled = false;
        m_fbbIK.enabled = false;
    }

    private void Update()
    {
        m_bodyLookAtIK.solver.FixTransforms();
        m_headLookAtIK.solver.FixTransforms();
        m_fbbIK.solver.FixTransforms();
        m_rightArmIK.solver.FixTransforms();
        m_leftArmIK.solver.FixTransforms();
    }

    private void LateUpdate()
    {
        LookAtIKUpdate();
        FBBIKUpdate();
        ArmsIKUpdate();
    }

    ...

    private void FBBIKUpdate()
    {
        m_fbbIK.solver.Update();
    }
Make sure to move your Head Effector roughly at the same level as the head.
And with that we are done with the FinalIK setup. Let’s try adding some cool features now !
2 – Head Stabilization
In part 1 I finished showing you the issue of head stabilization with Full Body animation in FPS games. We are going to fix it right now and with FinalIK it’s really easy to do.
Go in the UpperBodyIK script and add some fields. We need the Camera Transform, the HeadTarget Transform and the Head Effector Transform.
Then in the FBBIKUpdate method we’re going to fix the issue with only two lines ! We’re just using the LookAt method from the Transform component to make our Head Effector and our Camera look at the HeadTarget.
    ...

    [Header("LookAt Settings")]
    [SerializeField]
    private Transform m_camera = default;
    [SerializeField]
    private Transform m_headTarget = default;

    [Header("Head Effector Settings")]
    [SerializeField]
    private Transform m_headEffector = default;

    ...

    private void FBBIKUpdate()
    {
        m_fbbIK.solver.Update();

        m_camera.LookAt(m_headTarget);
        m_headEffector.LookAt(m_headTarget);
    }
Assign the corresponding Transform in the inspector and let’s look in game how it works.
-
"_headEffector.rotation *= Quaternion.Euler(yourXRotation, yourYRotation, -yourZRotation);"
-
It needs to be called just after this line in the FBBIKUpdate method:
-
" _headEffector.LookAt(_headTarget);"
It works like a charm ! If you want to have a bit more or less of head bobbing try to decrease or increase the Rotation Weight and the Position Weight of the Head Effector component.
Let me explain how theses two lines are solving a such big issue. If you watched the video that I linked in the preceding part you should already understand a bit. In the video, the Lead Animation Engineer from Star Citizen says that there are two things to fix. The first one is that human eyes rolls to counter the head rotation, so we need to apply a counter rotation too. For that we use a point far in the distance (HeadTarget) and use the LookAt method.
The other part is to damper the head position. As we can’t replicate the process of the human brain to stabilize the picture we’re going to take a look at how birds keep their vision stable.

Since they can’t roll their eyes as a human does they just keep the head stable. And that’s exactly what the Head Effector component does on our character.
3 – Aim down sight System
Let’s add an ADS (Aim Down Sight) system. Earlier we created three targets for our right hand, we are going to need them in the script so add three Transform fields for them. Then add two float fields, one for the hand follow speed and the other for the ADS transition time. We also need to catch our input so add a field for the InputManager and then let’s add the mouse input in the InputManager script.
    ...

    [Header("Weapon Keys")]
    private KeyCode m_aimKey = KeyCode.Mouse1;

    protected bool m_aiming;

    public bool Aiming
    {
        get { return m_aiming; }
    }

    ...

    protected void HandleInput()
    {
        m_forward = Input.GetAxis(m_forwardAxis);
        m_sideway = Input.GetAxis(m_sidewayAxis);
        m_aiming = Input.GetKey(m_aimKey);
    }

   ...
Then go back to the UpperBodyIK script and Create an AimDownSightUpdate method, call it in the ArmsIKUpdate just before updating the ArmIK solvers.
In this new method we have a float that we will Lerp between 0 and 1 to know at which state of our transition between ADS and Hips position we are. When we press the right click the value will Lerp to 1 and it will Lerp to 0 when we release it.
We then use this value to Lerp a position between our Hips position and ADS position.
For a smooth movement we use the method Vector3.SmoothDamp to compute the final position. We use the same process for the rotation (but with Quaternion of course).
    ...

    [Header("Arms Settings")]
    [SerializeField]
    private Transform m_rightHandTarget = default;
    [SerializeField]
    private float m_rightHandPosSpeed = 1f;
    [SerializeField]
    private float m_rightHandRotSpeed = 1f;

    [Header("ADS Settings")]
    [SerializeField]
    private Transform m_rightHandHips = default;
    [SerializeField]
    private Transform m_rightHandADS = default;
    [SerializeField]
    private float m_adsTransitionTime = 1f;

    ...

    private float m_transitionADS;
    private Vector3 m_rightHandFollow;
    private Quaternion m_rightHandFollowRot;
    private Vector3 m_refRightHandFollow;

    ...

    private void ArmsIKUpdate()
    {
        AimDownSightUpdate();
        m_rightArmIK.solver.Update();
        m_leftArmIK.solver.Update();
    }

    ...

    private void AimDownSightUpdate()
    {
        if (m_inputManager.Aiming == false)
        {
            m_transitionADS = Mathf.Lerp(m_transitionADS, 0,
               Time.smoothDeltaTime * m_adsTransitionTime);
            m_rightHandTarget.rotation = m_rightHandHips.rotation;
        }
        else
        {
            m_transitionADS = Mathf.Lerp(m_transitionADS, 1,
                Time.smoothDeltaTime * m_adsTransitionTime);
            m_rightHandTarget.rotation = m_rightHandADS.rotation;

        }

        m_rightHandFollow = Vector3.Lerp(m_rightHandHips.position,
            m_rightHandADS.position, m_transitionADS);

        m_rightHandFollowRot = Quaternion.Lerp(m_rightHandHips.rotation,
            m_rightHandADS.rotation, m_transitionADS);

        m_rightHandTarget.position =
            Vector3.SmoothDamp(m_rightHandTarget.position,
            m_rightHandFollow, ref m_refRightHandFollow,
            m_rightHandPosSpeed * Time.smoothDeltaTime);

        m_rightHandTarget.rotation =
            Quaternion.Lerp(m_rightHandTarget.rotation,
            m_rightHandFollowRot, Time.smoothDeltaTime *
            m_rightHandRotSpeed);
    }
For the RightHandPosSpeed and RightHandRotSpeed I use 1.25f and for the ADSTransitionTime I use 18. Drag and drop the required components and press play to check if it’s working.

Looks pretty good already. To make look we can make a little zoom in / zoom out effect. For that we need the Camera component. A float for our default FOV (Field of View) and another one for our ADS FOV. And then we just have to Lerp between theses two values the same way we did for our position and rotation.
    ...

    [SerializeField]
    private Camera m_mainCamera = default;
    [SerializeField]
    private float m_hipsFov = 60f;
    [SerializeField]
    private float m_adsFov = 40f;

    ...

    private void AimDownSightUpdate()
    {
       ...

        m_rightHandFollowRot = Quaternion.Lerp(m_rightHandHips.rotation,
            m_rightHandADS.rotation, m_transitionADS);

        m_mainCamera.fieldOfView = Mathf.Lerp(m_hipsFov, m_adsFov,
            m_transitionADS);

        m_rightHandTarget.position =
            Vector3.SmoothDamp(m_rightHandTarget.position,
            m_rightHandFollow, ref m_refRightHandFollow,
            m_rightHandPosSpeed * Time.smoothDeltaTime);

       ...
    }
It really adds a little something that makes it looks good.
4 – Weapon Sway
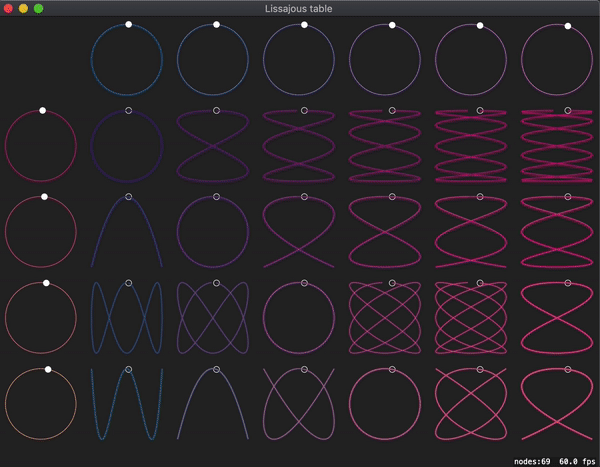
We call weapon sway the fact that the weapon moves always a little bit, even when we don’t touch the mouse. Like a breathing effect. We are going to use some math here to make this effect. Not to worry we are just taking a function that produce a curve. To be more precise, it’s called the Lissajous curve. It’s a curve that loops perfectly and can have different shape by changing some parameters.
It is really a satisfying gif 🙂 … Anyway, back to scripting ! Start by creating an UpdateSwayOffset method and call if from the ArmIKUpdate method just before the AimDownSightUpdate method. We will need to store two values. The current Vector3 of the sway offset and the float theta that is used to compute the next position on the curve. Create a LissajousCurve method that will compute our next Vector3 for a given set of parameters. I spare you with the maths so here is the code
    ...

    [Header("Sway settings")]
    [SerializeField]
    private float m_A = 1;
    [SerializeField]
    private float m_B = 2;
    [SerializeField]
    private float m_sizeReducerFactor = 10f;
    [SerializeField]
    private float m_thetaIncreaseFactor = 0.01f;
    [SerializeField]
    private float m_swayLerpSpeed = 15f;

    ...

    private float m_theta;
    private Vector3 m_swayPos;

    ...

    private void ArmsIKUpdate()
    {
        UpdateSwayOffset();
        AimDownSightUpdate();
        m_rightArmIK.solver.Update();
        m_leftArmIK.solver.Update();
    }

    private void AimDownSightUpdate()
    {

        ...

        m_mainCamera.fieldOfView = Mathf.Lerp(m_hipsFov, m_adsFov,
            m_transitionADS);

        m_rightHandFollow += m_camera.TransformVector(m_swayPos);

        m_rightHandTarget.position =
            Vector3.SmoothDamp(m_rightHandTarget.position,
            m_rightHandFollow, ref m_refRightHandFollow,
            m_rightHandPosSpeed * Time.smoothDeltaTime);

        ...

    }

    private void UpdateSwayOffset()
    {
        Vector3 targetPos = (LissajousCurve(m_theta, m_A, Mathf.PI, m_B) /
            m_sizeReducerFactor);
        m_swayPos = Vector3.Lerp(m_swayPos, targetPos,
            Time.smoothDeltaTime * m_swayLerpSpeed);
        m_theta += m_thetaIncreaseFactor;
    }

    private Vector3 LissajousCurve(float theta, float A, float delta, float B)
    {
        Vector3 pos = Vector3.zero;
        pos.x = Mathf.Sin(theta);
        pos.y = A * Mathf.Sin(B * theta + delta);
        return pos;
    }
You can try to play a bit with the parameters to check the different results. Or you can look up online to find a specific pattern. You can even think of a system where the m_sizeReducerFactor increase if your character is tired or decrease if you hold your breath.
The values I use are: A = 1, B = 2, Size Reducer ~= 1000-2000, Theta Increase = 0.01 and Sway Lerp Speed = 15
5 – Move look direction & Rotate Character
It may seem a bit late to add this feature, but there was a lot of stuff to do first. So we’re going to use mouse movement to move our look direction. In order to do that we need to update our HeadLookAtTarget and BodyLookAtTarget.
But first we need to catch our mouse input, so head to the InputManager script and add two strings for our Mouse X axis and Mouse Y axis. Also, we need two floats for the mouse sensitivity on the X and Y axis.
    [Header("Camera Axis")]
    private string m_verticalLookAxis = "Mouse Y";
    private string m_horizontalLookAxis = "Mouse X";
    private float m_xAxisSensitivity = 0.2f;
    private float m_yAxisSensitivity = 0.2f;

    ...

    protected float m_xAxis;
    protected float m_yAxis;

    ...

    public float XLookAxis
    {
        get { return m_xAxis; }
    }

    public float YLookAxis
    {
        get { return m_yAxis; }
    }

    ...

    protected void HandleInput()
    {
        m_forward = Input.GetAxis(m_forwardAxis);
        m_sideway = Input.GetAxis(m_sidewayAxis);
        m_aiming = Input.GetKey(m_aimKey);
        m_xAxis = Input.GetAxis(m_horizontalLookAxis) * m_xAxisSensitivity;
        m_yAxis = Input.GetAxis(m_verticalLookAxis) * m_yAxisSensitivity;
    }
Then, go back to your UpperBodyIK script and create a method UpdateLookTargetPos. Call it at the end of the FBBIKUpdate method.
In this method we will move our targets using our mouse input. We need to clamp this input to avoid the viewing angle to be too wide so our character will not snaps his neck.
We need to define our maxAngleUp and maxAngleDown and then use the method Vector3.SignedAngle to get the angle between the camera look direction and the forward direction of the character.
    ...

    [SerializeField]
    private Transform m_bodyTarget = default;
    [Range(-89, 0)]
    [SerializeField]
    private float _maxAngleUp = -50f;
    [Range(0, 89)]
    [SerializeField]
    private float _maxAngleDown = 70f;

    ...

    private void UpdateLookTargetPos()
    {
        Vector3 targetForward = Quaternion.LookRotation(new
            Vector3(m_camera.transform.forward.x, 0f,
            m_camera.transform.forward.z)) * Vector3.forward;
        float angle = Vector3.SignedAngle(targetForward, m_camera.forward,
            m_camera.right);

        float percent;
        float maxY = 100f;
        float minY = -100f;
        if (angle < 0)
        {
            percent = Mathf.Clamp01(angle / _maxAngleUp);
            if (percent >= 1f)
            {
                maxY = 0f;
            }
        }
        else
        {
            percent = Mathf.Clamp01(angle / _maxAngleDown);
            if (percent >= 1f)
            {
                minY = 0f;
            }
        }

        Vector3 offset = m_camera.right * m_inputManager.XLookAxis +
            m_camera.up * Mathf.Clamp(m_inputManager.YLookAxis, minY,
            maxY);
        offset += m_headTarget.transform.position;
            Vector3 projectedPoint = (offset -
            m_camera.position).normalized * 20f + m_camera.position;
    }
As I said earlier, we are going to set an angle in the inspector and the script will compute the BodyLookAtTarget position itself. But how are we going to do that ? Well with some very basic maths 🙂
First we need to get the new HeadLookAtTarget position with the input from the mouse. Then we are going to use some trigonometry to compute the BodyLookAtTarget position. I made a little drawing for you.
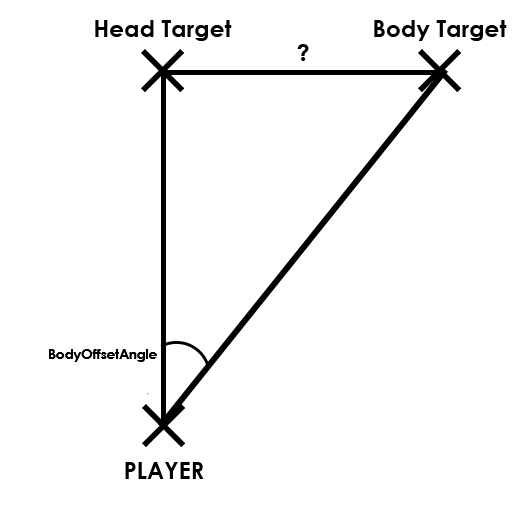
We want the value of the “?” on the drawing. To do that let’s create a short method GetPosFromAngle.
    private Vector3 GetPosFromAngle(Vector3 projectedPoint, float angle, Vector3 axis)
    {
        float dist = (projectedPoint - transform.position).magnitude *
            Mathf.Tan(angle * Mathf.Deg2Rad);
        return projectedPoint + (dist * axis);
    }
Now let’s update our HeadLookAtTarget and BodyLookAtTarget positions.
    ...

    [Range(-89f, 89f)]
    private float m_bodyOffsetAngle = 45f;

    ...

    private void UpdateLookTargetPos()
    {
       ...
        Vector3 projectedPoint = (offset - m_camera.position).normalized *
            20f + m_camera.position;

        m_headTarget.transform.position = projectedPoint;
        m_bodyTarget.transform.position = GetPosFromAngle(projectedPoint,
            m_bodyOffsetAngle, transform.right);
    }
So let’s check what does it looks like in game.
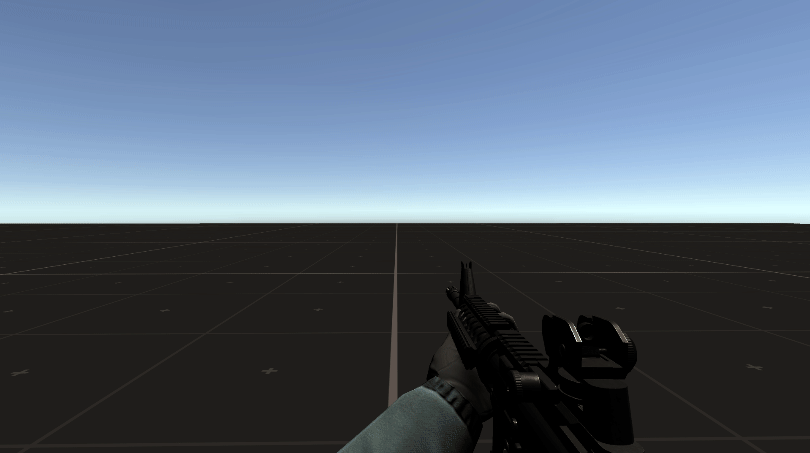
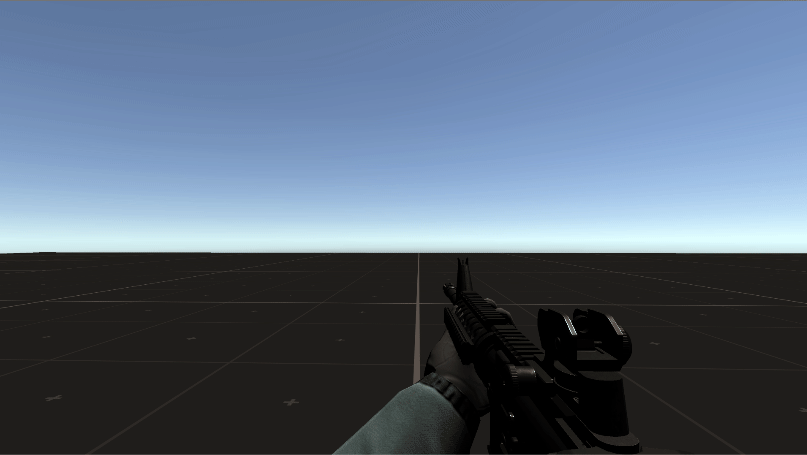
It’s not bad at all. But you might notice that when the character looks up the weapon rotate on the side. That is due to the fact that the body is at an angle of 45°. To fix that we just need to lerp our angle to 0 when we look up (or down).
    ...

    private float m_currentBodyAngle;

    ...

    private void Start()
    {
        Cursor.visible = false;
        Cursor.lockState = CursorLockMode.Locked;

        m_headLookAtIK.enabled = false;
        m_bodyLookAtIK.enabled = false;
        m_rightArmIK.enabled = false;
        m_leftArmIK.enabled = false;
        m_fbbIK.enabled = false;

        m_currentBodyAngle = m_bodyOffsetAngle;
    }

    ...

    private void UpdateLookTargetPos()
    {
        ...

        Vector3 projectedPoint = (offset - m_camera.position).normalized *
            20f + m_camera.position;

        m_currentBodyAngle = Mathf.Lerp(m_bodyOffsetAngle, 0, percent);

        m_headTarget.transform.position = projectedPoint;
        m_bodyTarget.transform.position = GetPosFromAngle(projectedPoint,
            m_currentBodyAngle, transform.right);
    }
While we’re here let’s add the character rotation. It’s a simple Quaternion.Lerp between the current rotation and the forward camera direction.
    ...

    [SerializeField]
    private float m_rotateSpeed = 7f;

    ...

    private void FBBIKUpdate()
    {
        m_fbbIK.solver.Update();

        m_camera.LookAt(m_headTarget);
        m_headEffector.LookAt(m_headTarget);

        UpdateLookTargetPos();
        transform.rotation = Quaternion.Lerp(transform.rotation,
            Quaternion.LookRotation(new
            Vector3(m_camera.transform.forward.x, 0f,
            m_camera.transform.forward.z)), Time.smoothDeltaTime *
            m_rotateSpeed);
    }
As you can see our character rotation is good, but when we move the target stay in place and we don’t want that. An easy fix is to add a RigidBody component on the HeadLookAtTarget and disable the gravity on it. Then in the Locomotion script we give the player velocity to the HeadLookAtTarget Rigidbody.
    ...

    [SerializeField]
    private Rigidbody m_headTargetRigidbody = default;

    ...

    private void UpdatePhysics()
    {
        ...

        m_rb.velocity = (m_movementDir * m_movementSpeed * m_inputAmount)
            + m_gravity;
        m_headTargetRigidbody.velocity = m_rb.velocity;

        ...
    }
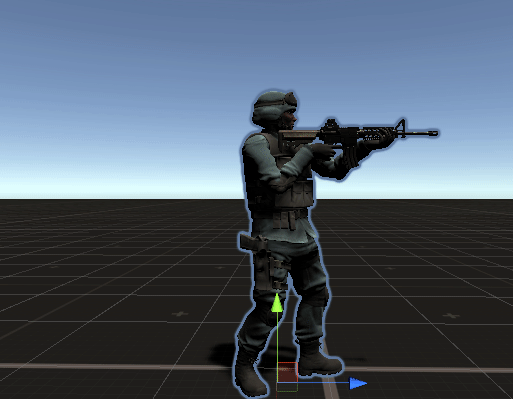
It’s starting to look great ! But again we can see a little issue when we look up or down the legs are stretched so our character looks weird. That’s because we aren’t updating the HeadEffector position.
6 – Fixing the HeadEffector position
In order to fix this issue we need 3 empty Gameobject that we will use as a reference position for our HeadEffector. They need to be children of the player Gameobject. The first is the neutral (default) position (0, 1.55, 0). The second is for the Up position (0, 1.4, -0.235). And the last one is for the down position (0, 1.375, 0.235). You can always modify theses position, I just give mine as reference.
Then in the UpperBodyIK script we need three Transform fields and then we will use existing code in the UpdateLookTargetPos method to get the current angle. We will Lerp between the three positions.
    ...

    [SerializeField]
    private Transform m_headEffectorNeutral = default;
    [SerializeField]
    private Transform m_headEffectorUp = default;
    [SerializeField]
    private Transform m_headEffectorDown = default;

    ...

    private void UpdateLookTargetPos()
    {
        ...

        if (angle < 0)
        {
            percent = Mathf.Clamp01(angle / _maxAngleUp);
            if (percent >= 1f)
            {
                maxY = 0f;
            }
            m_headEffector.position =
                Vector3.Lerp(m_headEffectorNeutral.position,
                m_headEffectorUp.position, percent);
        }
        else
        {
            percent = Mathf.Clamp01(angle / _maxAngleDown);
            if (percent >= 1f)
            {
                minY = 0f;
            }
            m_headEffector.position =
                Vector3.Lerp(m_headEffectorNeutral.position,
                m_headEffectorDown.position, percent);
        }

        ...
    }
And just like that, it looks better.
7 – Conclusion
And with that you have a pretty solid base for your full body character controller. In the next parts I will cover some advanced features like the procedural leaning / crouching system, more animations and since it’s a shooter tutorial I will make a dedicated part for the realistic weapon / ballistic system.
This part was way longer than expected 🙂 I hope you enjoyed it and understood it as it covers some advanced stuff.